Friday, September 5, 2014

My First WordPress Plugin - Tutorial Part 2

WordPress is a very flexible framework, simple to use, easy to understand and developer friendly environment. To create a plugin in WordPress basic understanding of hook and filter and action is needed.  This tutorial will guide you through basic knowledge of hooks and filter and action and focused more importantly on plugin to Custom Post Type and Custom Taxonomy.

Hook:

In general, a hook is something that is particularly attached with another thing. As like that, hook defines the relation and dependency  between the functions and action or filter in WordPress.

  1. add_filter('the_content','helloworld');
  2. function helloworld($content){
  3. $content=$content."<br>Hello World. This is Semicolon Dev ";
  4. return $content;

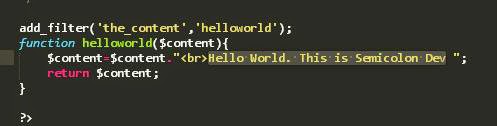
Lets take the above example. Here, we have used a filter function to get the content and add certain text at the end.  Line 1 has a filter:  add_filter('first_argument','second_argument') ; The first argument is used to get the content/description of the post and second one helloworld is a call to a function. Here helloworld is a function hooked with the_content.

A hook is generally used to change the default nature of the WordPress. The above example is used to change the default behavior of normal posting to adding content to each post.

Action and Filter :

Action and Filter are alias; An action hook is used to perform certain action and insert code in the WordPress core while filer hook is used to perform certain task on the content and supposed to return a value and are associated with an action.

add_action($hook$function_to_add$priority$accepted_args );
add_filter$tag$function_to_add$priority$accepted_args ); 

Custom Post Type:

It is a WordPress linked word which is normally harder to understand. We have a admin menu-Post to the left so Custom post type is a method to create our own post type naming it, the way we prefer, providing the features we feel necessary.

function custom_post(){
$labels_post = array(
'name' =>_x( 'Products', 'post type general name' ),
'singular_name' =>_x( 'Product', 'post type singular name' ),
'add_new' =>_x( 'Add Product', 'product' ),
'all_items' =>__( 'Available Products' ),
'add_new_item' =>__( 'Add New Products' ),
'edit_item' =>__( 'Edit Product' ),
'new_item' =>__( 'New Product' ),
'view_item' =>__( 'View Products'),
'search_items' =>__( 'Search Products' ),
'menu_name' => 'Products'
);
$args= array(
'labels' => $labels_post,
'description' => 'Product Description',
'public' => true,
'supports'                => array( 'title', 'editor', 'thumbnail','comments' ),
'menu_position' => 10
);
register_post_type('name-of-the-post', $args);
}
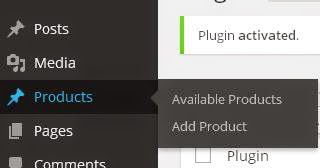


Here, we have created a Product as a custom post type enabling the developer to customize the available field.

Custom Taxonomy:

Taxonomy is a method of grouping things under a particular heading as like category and tags which are used to bind the post with certain tags and under particular category. 

register_taxonomy'product_categories''name-of-the-post'$args );
The first argument is the name of the taxonomy, second one is the name of the post-type and last argument is an array which is used to define the necessary functions of the WordPress to be included.

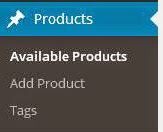
The side figure shows that the tag field has been created where the capabilities to edit, add and remove can be defined during its creation.Here $args is similar to that of above $args on labels declaration but its characteristics is defined by other values;

'hierarchical'             => true,
'show_admin_column'           => true,
'show_ui'                              => true,
'rewrite'                   => array('slug' => 'product-category', 'with_front'                                                                           =>FALSE),
'capabilities'              => array('assign_terms' => 'edit_products',
                                                   'edit_terms'   => 'edit_products',
                                                   'manage_terms' => 'edit_others_products',
                                                   'delete_terms' => 'delete_others_products')
Meta Box:

If we are creating our custom type post then it is certain that we need extra information to be included with our post which can be done using meta-boxes.


Creating a meta box is a simple task of adding an action during the post creation and it is performed with the below code:

add_action('add_meta_boxes','product_price');
Using the hook add_meta_box , we are set to create a metabox and second argument is a function which contains the features like id,title and its parent post type of the meta box.

add_meta_box$id$title$callback$post_type$context,$priority$callback_args );

  • $callback is the  reference to a  function that determines the label and input types within the meta data.The reference function takes $post as argument and a nonce field is included which is required later for verification while saving the data. wp_nonce_field  has action name and nonce name.  
  • $post_type is the name of the custom post type.
Creating meta box does not mean WordPress is going to save the data. A separate action, to save the data in the meta box table of the wordpress, has to be defined as

add_action('save_post','function-name');
In this case, the function takes $post_id as argument and it has to first verify the data with the nonce and update the post.

wp_verify_nonce($_POST['nonce-name'], 'action-name' )
$variable = $_POST['name-of-the-input-field'];
update_post_meta( $post_id, 'metabox-id', $variable );


Now, we have created a Custom Type Post and Custom Taxonomy and able to include extra field like product price using the meta-box.


Thanks for reading. Stay tuned for more posts in the series.
Friday, August 29, 2014

My First WordPress Plugin - Tutorial Part 1

WordPress Plugin is a set of one or more function that is particularly focused on performing certain task either adding a specific set of features or services to the WordPress weblog. It includes at least a PHP file and other files like css and javascript.

Step 1: Requirements

·         Familiar with basic functionality of WordPress and PHP programming
·         Installed WordPress with administrative privilege

Step 2: Folder Creation

The plugins for the WordPress are kept under the same location at wp_content/plugins. Create a folder with a unique name, the name of the folder should not coincide with other plugin name, as wp_content/plugins/your_plugin_folder_name . This folder is supposed to contain all the required files.

Step 3: File Creation

           Create a normal PHP file as index.php . The file contains the two sections:

3.1.       Plugin Detail

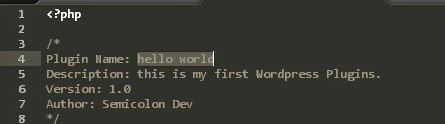
           The descriptions are provided as comment which contains the plugin’s name, description, version and author but there is no limitation to it. You can also add its URI, author URI and license.


The above information is used to display in the plugin section. 


3.2.       Plugin function

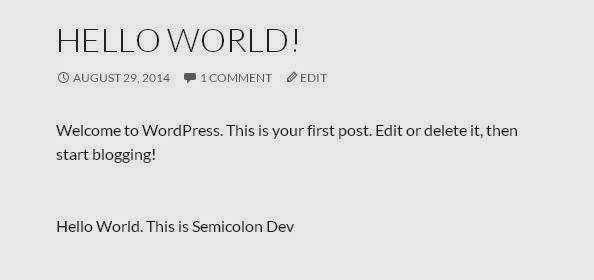
           This section is especially focused on the task as the plugin intend to perform. It contains atleast a function and may contain javascript and css files as per the complexity. As for example: a simple filter is shown below to add “Hello World. This is Semicolon Dev” at the end of the content of the pages.


Here, we have used the filter properties of WordPress with the function add_filter(); the filter takes two argument “the_content” which obtains the content of the post and next argument: a function name “helloworld”. This function adds “Hello World. This is Semicolon Dev” to the end of every post.

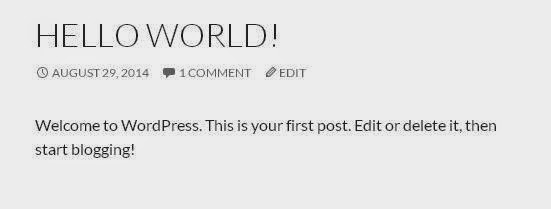
BEFORE PLUGIN ACTIVATION


AFTER PLUGIN ACTIVATION


Thursday, August 21, 2014

Android R.Java file disappeared, not generated or other common issues


What is R file?

It is an auto-generated file by aapt (Android Asset Packaging Tool) that contains resource IDs for all the resources of res/ directory. If you create any component in the activity_main.xml file, id for the corresponding component is automatically created in this file. This id can be used in the activity source file to perform any action on the component.
Note: If you delete R.jar file, android creates it automatically.

How R.java file will be created ?

In R.java file, each resource category will be created as one class. In each resource class all respective elements will be created as static members, means constants. So, we should not change these values. All these are final members also, so we must access them with their class names, like R.drawable.ic_launcher, R.layout.main, etc. See below codes to know how classes will be created for each resource category.

public final class R {  

    public static final class drawable {  
        public static final int ic_launcher=0x7f020000;  
   }  
    public static final class id {  
        public static final int menu_settings=0x7f070000;  
    }  
    public static final class layout {  
        public static final int activity_main=0x7f030000;  
    }  
    public static final class menu {  
        public static final int activity_main=0x7f060000;  
    }  
    public static final class string {  
        public static final int app_name=0x7f040000;  
        public static final int hello_world=0x7f040001;  
        public static final int menu_settings=0x7f040002;  
    }  


How many classes existed with name R in an android application ?

There are 2 classes available in each android application with name R.
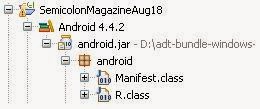
1. First class is part of android core system or android SDK, which can be accessed as android.R .We can see this class in R.class file which is available in android.jar file, which is automatically included in our project by ADT plugin.
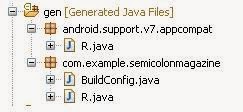
2. Second class is part of our application, which can be accessed as yourpackagename.R (yourpackagename is like com.example.semicolonmagazine). If there is support library attached in our project then , we can see two R.java file (one is support library R.java and another is our project R.java) which is available in directory gen. This R.java file is visible, only after successful build of your project.


Fig 1                                                                       Fig 2

Problems related to  R file?
·         Errors in res folder (e.g String.xml, menu.xml, other xml files within res folder)
·         May be problem in build target
·         problem in android sdk

Solution For R file not generating?

·         Fix all errors in your XML files
·         Run Project -> Clean (This will delete and regenerate R and BuildConfig)
·         Make sure Project -> Build Automatically is ticked. If not, build it manually via
Menu -> Project -> Build  Project .
·         Wait a few seconds for the errors to disappear.
·         If it doesn't work, delete everything inside the /gen/ folder
·         If it still doesn't work, try right-clicking your project -> Android Tools -> Fix Project Properties.
·         If again doesn’t work, Right-click your project > properties > Android. Look at the Project Build Target and Library sections on the right side of the page. -Your Build Target should match the target in your AndroidManifest.xml. So if it's set to target 17 in AndroidManifest, make sure that the -Target Name is Android 4.2.

·         If it still doesn't work , Make sure all the "import android.R" was removed - Clean again (if this doesn't fix it, restart eclipse and try again)

Hey Google, Android on Eclipse needs more love ! Please fix these minor issues.

Wednesday, December 25, 2013

Basic Android UI, Design Patterns & ListView

Here i'd like to note useful ideas, links i referenced during my my month of self learning Android application development. Hope it is helpful to others as well.

User Interface (UI) in Android

An app's user interface is everything that the user can see and interact with. The response to user input is designed to be immediate and provides a fluid touch interface, often using the vibration capabilities of the device to provide haptic feedback to the user.

To design a good user interface we must:
·     Focus on the user
o   Know the users
o   Age, skill level, culture
o   What they want to do with the app
o   What kinds of devices they’ll be using
o   When, where, how they’ll be using the devices
·     Design with a user first mentality
o   Users are generally task driven
o   Test on real users, early and often
·      Make the right things visible
o   The most common operation should be immediately visible and available
o   Secondary functionality should be reserved for the menu button
·     Show proper feedback
o   Have at least four states(<selector>) for all interactive UI elements
o   Make sure the effects of the action are clear and visible
o   Show adequate yet unobtrusive progress indicators
·     Be predictable
o   Do what the user expects
o   Properly interact with the activity stack
o   Show information and action user wants to see
o   Use proper affordances
o   If something is clickable, make sure it looks clickable
·     Be fault-tolerant
o   Constraint possible operations to only those that make sense
o   limit the number of irreversible actions
o   Prefer undo to confirmation dialogues

Views and ViewGroups

The basic unit of an Android application is an Activity. An Activity displays the user interface of the application, which may contain widgets like buttons, labels, text boxes, etc. Typically, we define the UI using an XML file (for example, the main.xml file located in the res/layout folder).

An Activity contains Views and ViewGroups. A View is a widget that has an appearance on screen. Examples of widgets are buttons, labels, text boxes, etc.

One or more Views can be grouped together into a ViewGroup. A ViewGroup (which is by itself is a special type of View) provides the layout in which you can order the appearance and sequence of views. Android supports the following ViewGroups:

·     LinearLayout
o   The LinearLayout arranges views in a single column or single row. Child views can either be arranged vertically or horizontally.
·     AbsoluteLayout
o   The AbsoluteLayout lets to specify the exact location of its children.
·      TableLayout
o   The TableLayout groups views into rows and columns. We use the <TableRow> element to designate a row in the table. Each row can contain one or more views. Each view you place within a row forms a cell. The width for each column is determined by the largest width of each cell in that column.
·      RelativeLayout
o   The RelativeLayout lets us specify how child views are positioned relative to each other.
·      FrameLayout
o   The FrameLayout is a placeholder on screen that we can use to display a single view. Views that is added to a FrameLayout is always anchored to the top left of the layout.
·      ScrollView
o   A ScrollView is a special type of FrameLayout in that it allows users to scroll through a list of views that occupy more space than the physical display.


Android UI Design Patterns


Like a software design pattern, a UI design pattern describes a general solution to a recurring problem. Patterns emerge as a natural by-product of the design process. The design patterns include:


Dashboard


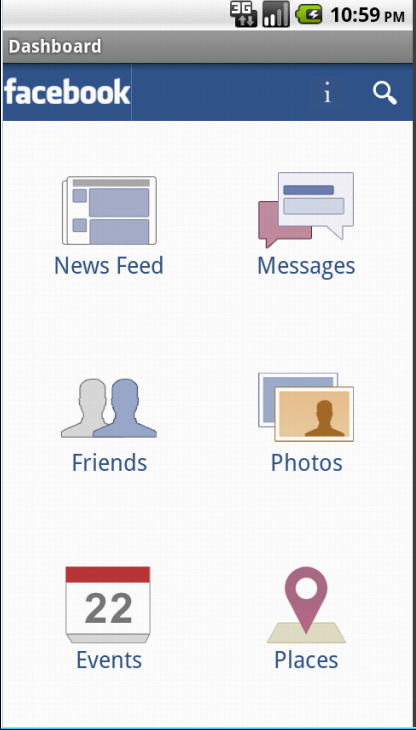
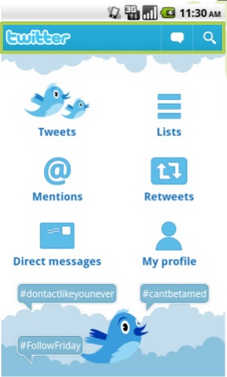
A quick intro to an app, revealing capabilities and proactively highlighting new content. It is the organized way of display to arrange the functionalities of the app.  It highlights what’s new and focuses on 3-8 most important choices. It should be flavorful as it is the first impression of the app.


Action Bar

It is a dedicated real estate at top of the screen to support navigation and frequently used operations. It can provide a quick link to dashboard (or other app home). It is used to bring key actions onscreen and helps to convey a sense of place. It is used consistently within the app.


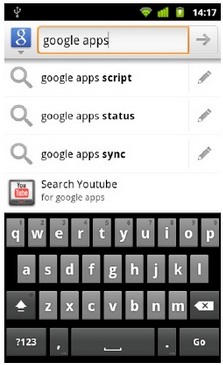
Search Bar
It is a consistent pop-in search form anchored to top of the screen. It can replace action bar (if present). It is used for simple searches which provides rich suggestions.


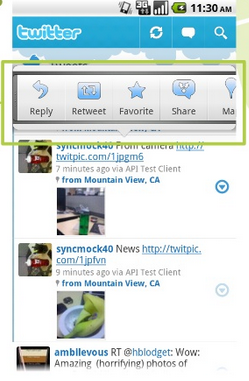
 Quick Actions
It is an action popup triggered from distinct visual target. It is minimally disruptive to screen context. Actions are straightforward, fast and fun. It is used when items have competing internal targets. It is present for most important and obvious actions.


ListView


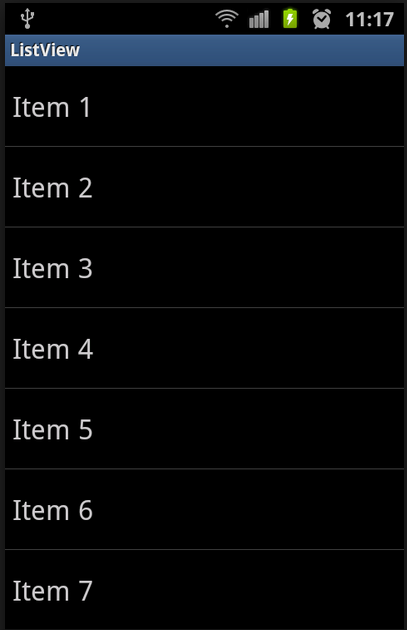
A Simple ListView is a view group that displays a list of scrollable items. The list items are automatically inserted to the list using an Adapter that pulls content from a source such as an array or database query and converts each item result into a view that's placed into the list.


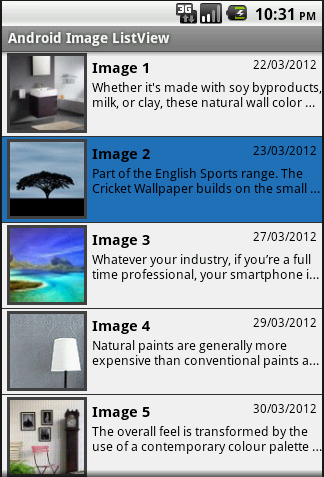
In a custom listview, we will create custom ListView where each row item consists of the views we want, and populate its items using custom ArrayAdapter. The Adapter defines how each row is displayed (i.e the layout for each row. We will define layout for rows in ListView in a XML file and place it in res/layout. The adapter provides data to each row in ListView.


We can customize our ListView with image that is not defined in the resource folder in android by loading images from the internet

It's a time-consume task to load bitmap from internet. Whenever we need to perform lengthy operation or any background operation we can use Asynctask which executes a task in background and publish results on the UI thread without having to manipulate threads and/or handlers. In onCreate(), we create and execute the task to load image from url. The task’s execute method invokes doInBackground() where we open a Http URL connection and create a Bitmap from InputStream and return it. Once the background computation finishes, onPostExecute() is invoked on the UI thread which sets the Bitmap on ImageView. The image should be cached in the phone in case we want to reuse it later. If the number of items to be downloaded exceeds a certain threshold(meaning more fetches and memory) we should consider reducing the fetches and also the Runtime memory consumption by caching them. We can choose to save them on Sdcard.


© 2013 Echo "Semicolon Developers"; Kathmandu. All rights resevered @ Semicolon Developers Network Pvt. Ltd.. Designed by Templateism

Back To Top