Showing posts with label Android. Show all posts

Tuesday, July 21, 2015

Launcher Activity without UI login / logout case


Redirect user to different activities based on login logout stats or other intro activities on first run of the app. Launcher activity without UI helps achieve this with no UI glitches.

SET:  android:theme="@android:style/Theme.NoDisplay"
In your manifest file

        <activity
            android:name=".LauncherActivity"
            android:screenOrientation="portrait"
            android:theme="@android:style/Theme.NoDisplay">

            <intent-filter>
                <action android:name="android.intent.action.MAIN" />

                <category android:name="android.intent.category.LAUNCHER" />
            </intent-filter>


        </activity>

Use Activity Like this

package com.semicolondev.app;


import android.app.Activity;
import android.content.Intent;
import android.content.SharedPreferences;
import android.os.Bundle;

public class LauncherActivity extends Activity {

SharedPreferences preferences;


@Override
protected void onCreate(Bundle savedInstanceState) {

super.onCreate(savedInstanceState);

preferences = getSharedPreferences("MyApp", 0);


String firstRun = preferences.getString("first_run", "yes");
String isLogin = preferences.getString("login", "no");

if (firstRun.equals("no") && isLogin.equals("no")){

finish();
startActivity(new Intent(getApplicationContext(), LoginActivity.class).addFlags(Intent.FLAG_ACTIVITY_NEW_TASK | Intent.FLAG_ACTIVITY_CLEAR_TASK));

} else if ( firstRun.equals("no") && isLogin.equals("yes")){

finish();
startActivity(new Intent(getApplicationContext(), MainActivity.class).addFlags(Intent.FLAG_ACTIVITY_NEW_TASK | Intent.FLAG_ACTIVITY_CLEAR_TASK));

} else {

finish();
startActivity(new Intent(getApplicationContext(), IntroActivity.class).addFlags(Intent.FLAG_ACTIVITY_NEW_TASK | Intent.FLAG_ACTIVITY_CLEAR_TASK));

}


//setContentView(R.layout.activity_main);


}


}

Tuesday, October 21, 2014

Android Services - Introduction

What is Service?

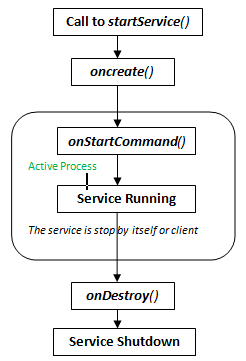
A service is a component that runs in background to run operation/tasks without user interaction.
i.e, a service might play music in the background while the user is in a different application, or it might fetch data over the server without blocking user interaction with in an activity.

Many Android apps need to do some things in the background when your application isn't open .
Maybe we need to periodically abstract data from server or maybe we need to have certain tasks run on an interval that is specified by users. Android Service is the best for these tasks.

Is service different from thread??

As we know services and thread are both run on background and both are run without user interaction. But they are very different in how they are applied in android application, and most importantly services is not a thread. It runs on the UI thread(User Interface thread) along with our application. Some time we have to use thread inside of services while lifting some heavy data from server in our application.

A service is usually take two state

1. Started:
It is started by activity by calling startService(), once it is started it runs on background indefinitely. It is basically used for downloading/uploading file over server (which is done for one time operation).
After its done it should stop itself.


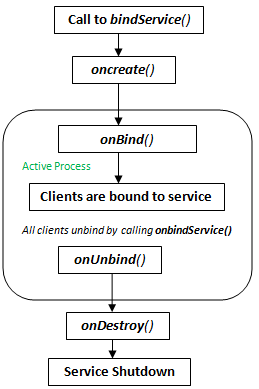
2. Bound:

It is started by activity by calling bindService(). A bount service offers client-server interface that allow component to interact with service, send request , get result, and even do so across processes with interprocess communication(IPC).

There are two type of services 

1. Platform services:
The android Platform Services are default android system services. The Android platform provides and runs predefined system services and every Android application can use them, given the right permissions. These system services are usually exposed via a specific Manager class. To access them we need  getSystemService() method. The Context class defines several constants for accessing these services.

2. Custom Services:
Custom services allows us to design responsive applications.We can fetch the application data via it and once the application is started by the user, it can present fresh data to the users.

How to create a custom services in android app, its so simple look below.

//creating a new class for service
public class MyService extends Service {
  @Override
  public IBinder onBind(Intent arg0) {
            //TODO for communication return IBinder implementation
           return null;
  }

  @Override
  public int onStartCommand(Intent intent, int flags, int startId) {
     // Let it continue running until it is stopped.
     Toast.makeText(this, "Service Started", Toast.LENGTH_LONG).show();
     return START_STICKY;
  }

  @Override
  public void onDestroy() {
     super.onDestroy();
     Toast.makeText(this, "Service Destroyed", Toast.LENGTH_LONG).show();
  }
}

 Calling  services in our activity....

public class MainActivity extends Activity {
@Override 

     public void onCreate(Bundle savedInstanceState)
      {  
         super.onCreate(savedInstanceState);
setContentView(R.layout.main);

             //Start service 
startService(new Intent(getBaseContext(), MyService.class));
     }

Finally a service needs to be declared in the AndroidManifest.xml file...like below
 <service android:name=".MyService" />


How to start Services regularly via AlarmManager?

Here is the complete example of starting Service regularly via AlarmManager to notify user through NotificationManager. For this we need to create MyService (extends IntentService), AlarmNotificationReceicer (extends BroadcastReceiver), MainActivity (extends Activity) and declare service and receiver in AndroidMinfeast.xml file...See  below.....

1. Make a Class for Service which Extends IntentService.

package com.examples.semicolon.Alarms;

import android.app.AlarmManager;
import android.app.IntentService;
import android.app.PendingIntent;
import android.content.Intent;
import android.os.SystemClock;

public class MyService extends IntentService {

private AlarmManager mAlarmManager;
private Intent mNotificationReceiverIntent, mLoggerReceiverIntent;
private PendingIntent mNotificationReceiverPendingIntent,
mLoggerReceiverPendingIntent;
private static final long INITIAL_ALARM_DELAY = 1 * 60 * 1000;

public MyService() {


super("Semicolon");
}

@Override
protected void onHandleIntent(Intent intent) {

// Get the AlarmManager Service(platform services)
mAlarmManager = (AlarmManager) getSystemService(ALARM_SERVICE);

// Create PendingIntent to start the AlarmNotificationReceiver
mNotificationReceiverIntent = new Intent(MyService.this,
AlarmNotificationReceiver.class);
mNotificationReceiverPendingIntent = PendingIntent.getBroadcast(
PlayService.this, 0, mNotificationReceiverIntent, 0);

// seting repeated alarm
mAlarmManager.setRepeating(AlarmManager.ELAPSED_REALTIME,
SystemClock.elapsedRealtime() + INITIAL_ALARM_DELAY,
INITIAL_ALARM_DELAY, mNotificationReceiverPendingIntent);

}

}


2. Make a class for Notification which extends BroadcastReceiver

package com.examples.semicolon.Alarms;

import java.text.DateFormat;
import java.util.Date;
import android.app.Notification;
import android.app.NotificationManager;
import android.app.PendingIntent;
import android.content.BroadcastReceiver;
import android.content.Context;
import android.content.Intent;
import android.net.Uri;
import android.util.Log;
import course.examples.Alarms.AlarmCreate2.R;

public class AlarmNotificationReceiver extends BroadcastReceiver {
// Notification ID to allow for future updates
private static final int MY_NOTIFICATION_ID = 1;
private static final String TAG = "AlarmNotificationReceiver";

// Notification Text Elements
private final CharSequence tickerText = "Are You Playing games Again!";
private final CharSequence contentTitle = "A Kind of Reminder";
private final CharSequence contentText = "Get back to studying!!";

// Notification Action Elements
private Intent mNotificationIntent;
private PendingIntent mContentIntent;

// Notification Sound and Vibration on Arrival
private Uri soundURI = Uri.parse("android.resource://com.examples.semicolon.Alarms/"
+ R.raw.alarm_rooster);
private long[] mVibratePattern = { 0, 200, 200, 300 };

@Override
public void onReceive(Context context, Intent intent) {

mNotificationIntent = new Intent(context, MainActivity.class);
mContentIntent = PendingIntent.getActivity(context, 0,
mNotificationIntent, Intent.FLAG_ACTIVITY_NEW_TASK);

                 // notification building
Notification.Builder notificationBuilder = new Notification.Builder(

context).setTicker(tickerText)
.setSmallIcon(android.R.drawable.stat_sys_warning)// icon from drawable
.setAutoCancel(true).setContentTitle(contentTitle)
.setContentText(contentText).setContentIntent(mContentIntent)
.setSound(soundURI).setVibrate(mVibratePattern);

// Pass the Notification to the NotificationManager:
NotificationManager mNotificationManager = (NotificationManager) context
.getSystemService(Context.NOTIFICATION_SERVICE);
mNotificationManager.notify(MY_NOTIFICATION_ID,
notificationBuilder.build());

Log.i(TAG,"Sending notification at:" + DateFormat.getDateTimeInstance().format(new                      Date()));

}
}

3. Creating  the activity and calling the service in an activity.


package com.examples.semicolon.Alarms;

import android.app.Activity;
import android.content.Intent;
import android.os.Bundle;
import course.examples.Alarms.AlarmCreate2.R;

public class MainActivity extends Activity {

@Override
public void onCreate(Bundle savedInstanceState) {
super.onCreate(savedInstanceState);
setContentView(R.layout.main);
                //start the service
startService(new Intent(getBaseContext(), MyService.class));
}
}

4. Defined the Service and Receiver in AndroidManifest.xml file

<?xml version="1.0" encoding="utf-8"?>
<manifest xmlns:android="http://schemas.android.com/apk/res/android"
    package="com.examples.semicolon.Alarms"
    android:versionCode="1"
    android:versionName="1.0" >

    <uses-sdk
        android:minSdkVersion="14"
        android:targetSdkVersion="19" />

    <uses-permission android:name="android.permission.VIBRATE" />

    <application
        android:allowBackup="false"
        android:icon="@drawable/icon"
        android:label="@string/app_name" >
        <activity
            android:name="com.examples.semicolon.Alarms.MainActivity"
            android:label="@string/app_name" >
            <intent-filter>
                <action android:name="android.intent.action.MAIN" />

                <category android:name="android.intent.category.LAUNCHER" />
            </intent-filter>
        </activity>

        <receiver android:name="com.examples.semicolon.Alarms.AlarmNotificationReceiver" />
        <service android:name="com.examples.semicolon.Alarms.PlayService" />

    </application>

</manifest>

The output of  above code: You will receive a notification in every 1 minute of time interval even your app is not open.


Wednesday, September 24, 2014

Android Expandable List View Tutorial

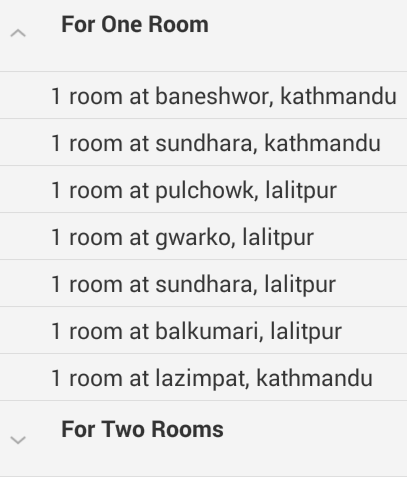
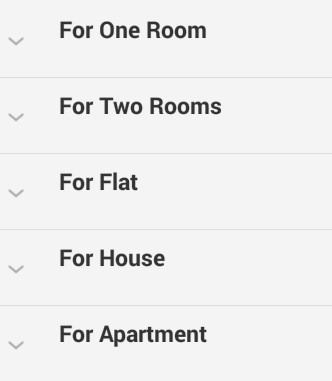
Expandable list view is used to group list data by categories. It has the capability of expanding and collapsing the groups when user touches header of list view. When u click on the header of list view it expands and when u again click on the same header it collapse. Like in below figures...

                         
                               Fig 1: Expanding Mode
Fig 2: Collapsing Mode

Some time we need to extend group header by default, for this
 we have following bits of code..
expandableList.expandGroup(0); //expand first position by default
expandableList.expandGroup(1); //expand second position by default

One more thing sometime we need to disable the collapsing feature in expandable list view for this we have ,
expandableList.setOnGroupClickListener(new OnGroupClickListener() {

@Override
public boolean onGroupClick(ExpandableListView parent, View v,
int groupPosition, long id) {
if(groupPosition==0)//disable collapsing feature of group header first position
                                   {
                                      return true;
}else{
return false;
}
}

});
In override the onGroupClick method. If true, the expandableListView thinks that the ability to expand and collapse has been handled. If false then it has not been handled, and will take care of the action. 

To generate expandable list view in project we need three layouts, one Adapter and one Main Activity.
The three layout goes like this....
1. main_activity.xml 
<LinearLayout xmlns:android="http://schemas.android.com/apk/res/android"
    android:layout_width="fill_parent"
    android:layout_height="fill_parent"
    android:orientation="vertical" >
    <ExpandableListView
        android:id="@+id/expandableList"
        android:layout_width="match_parent"
        android:layout_height="match_parent" />
</LinearLayout>

2. list_group.xml
<LinearLayout xmlns:android="http://schemas.android.com/apk/res/android"
    android:layout_width="fill_parent"
    android:layout_height="wrap_content"
    android:orientation="vertical"
    android:padding="10dp" >
    <TextView
        android:id="@+id/listHeader"
        android:layout_width="fill_parent"
        android:layout_height="40dp"
        android:paddingLeft="?android:attr/expandableListPreferredItemPaddingLeft"
        android:textSize="16sp" />
</LinearLayout>

3. list_item.xml
<LinearLayout xmlns:android="http://schemas.android.com/apk/res/android"
    android:layout_width="match_parent"
    android:layout_height="55dip"
    android:orientation="vertical" >
    <TextView
        android:id="@+id/listItem"
        android:layout_width="fill_parent"
        android:layout_height="wrap_content"
        android:textSize="17dip"
        android:paddingTop="5dp"
        android:paddingBottom="5dp"
        android:paddingLeft="?android:attr/expandableListPreferredChildPaddingLeft" />
</LinearLayout>

Now we have to create ExpandableListAdapter.java like this...
For import -> ctrl + alt +o  
public class ExpandableListAdapter extends BaseExpandableListAdapter {
   private Context context;
   private List<String> listDataHeader;   // header titles
   private HashMap<String, List<String>> listDataChild;

   public ExpandableListAdapter(Context context, List<String> listDataHeader,
           HashMap<String, List<String>> listChildData) {
       this.context = context;
       this.listDataHeader = listDataHeader;
       this.listDataChild = listChildData;
   }
   @Override
   public Object getChild(int groupPosition, int childPosititon) {
       return this.listDataChild.get(this.listDataHeader.get(groupPosition))
               .get(childPosititon);
   }
   @Override
   public long getChildId(int groupPosition, int childPosition) {
       return childPosition;
   }  
   @Override
   public View getChildView(int groupPosition, final int childPosition,
           boolean isLastChild, View convertView, ViewGroup parent) {
       final String childText = (String) getChild(groupPosition, childPosition);
       if (convertView == null) {
           LayoutInflater infalInflater = (LayoutInflater) this._context
                   .getSystemService(Context.LAYOUT_INFLATER_SERVICE);
           convertView = infalInflater.inflate(R.layout.list_item, null);
       }
       TextView txtListChild = (TextView) convertView
               .findViewById(R.id.listItem);
       txtListChild.setText(childText);
       return convertView;
   }
   @Override
   public int getChildrenCount(int groupPosition) {
       return this.listDataChild.get(this.listDataHeader.get(groupPosition))
               .size();
   }  
   @Override
   public Object getGroup(int groupPosition) {
       return this.listDataHeader.get(groupPosition);
   } 
   @Override
   public int getGroupCount() {
       return this.listDataHeader.size();
   } 
   @Override
   public long getGroupId(int groupPosition) {
       return groupPosition;
   } 
   @Override
   public View getGroupView(int groupPosition, boolean isExpanded,
           View convertView, ViewGroup parent) {
       String headerTitle = (String) getGroup(groupPosition);
       if (convertView == null) {
           LayoutInflater infalInflater = (LayoutInflater) this._context
                   .getSystemService(Context.LAYOUT_INFLATER_SERVICE);
           convertView = infalInflater.inflate(R.layout.list_group, null);
       }
 
       TextView lblListHeader = (TextView) convertView
               .findViewById(R.id.listHeader);
       lblListHeader.setTypeface(null, Typeface.BOLD); //bold the header
       lblListHeader.setText(headerTitle);
 
       return convertView;
   }
 
   @Override
   public boolean hasStableIds() {
       return false;
   }
 
   @Override
   public boolean isChildSelectable(int groupPosition, int childPosition) {
       return true;
   }
}

Finally MainActivity.java goes like this...
For import ctrl + alt + o
public class MainActivity extends Activity {

ExpandableListAdapter listAdapter;
ExpandableListView expListView;
List<String> listDataHeader;
HashMap<String, List<String>> listDataChild;

@Override
protected void onCreate(Bundle savedInstanceState) {
super.onCreate(savedInstanceState);
setContentView(R.layout.activity_main);
// get the listview
expListView = (ExpandableListView) findViewById(R.id.expandableList);
getPrepareListData(); // preparing list data
listAdapter = new ExpandableListAdapter(this, listDataHeader, listDataChild);
expListView.setAdapter(listAdapter); //set the  list adapter

// Listview Group click listener
expListView.setOnGroupClickListener(new OnGroupClickListener() {
@Override
public boolean onGroupClick(ExpandableListView parent, View v,
int groupPosition, long id) {
//do ur task
return false;
}
});

// Listview Group expanded listener
expListView.setOnGroupExpandListener(new OnGroupExpandListener() {

@Override
public void onGroupExpand(int groupPosition) {
//do ur task
}
});

// Listview Group collasped listener
expListView.setOnGroupCollapseListener(new OnGroupCollapseListener() {

@Override
public void onGroupCollapse(int groupPosition) {
//do ur task
}
});

// Listview on child click listener
expListView.setOnChildClickListener(new OnChildClickListener() {
@Override
public boolean onChildClick(ExpandableListView parent, View v,
int groupPosition, int childPosition, long id) {
// TODO Auto-generated method stub
//do ur task
return false;
}
});
}
private void getPrepareListData() {
listDataHeader = new ArrayList<String>();
listDataChild = new HashMap<String, List<String>>();
// Adding header data
listDataHeader.add("For One Room");
listDataHeader.add("For Two Rooms");
listDataHeader.add("For Flat");
listDataHeader.add("For House");
listDataHeader.add("For Apartment");
// Adding child data
List<String> one_room = new ArrayList<String>();
one_room.add("1 room at baneshwor, kathmandu");
one_room.add("1 room at sundhara, kathmandu");
one_room.add("1 room at pulchowk, lalitpur");
one_room.add("1 room at gwarko, lalitpur");
one_room.add("1 room at sundhara, lalitpur");
one_room.add("1 room at balkumari, lalitpur");
one_room.add("1 room at lazimpat, kathmandu");

List<String> two_room = new ArrayList<String>();
two_room.add("2 rooms at baneshwor, kathmandu");
two_room.add("2 rooms at sundhara, kathmandu");

List<String> flat = new ArrayList<String>();
flat.add("1 flat at baneshwor, kathmandu");
flat.add("1 flat at sundhara, kathmandu");

listDataChild.put(listDataHeader.get(0), one_room); // Header, Child listDataChild.put(listDataHeader.get(1), two_room);
listDataChild.put(listDataHeader.get(2), flat); //you can add others here
}
}

Thursday, August 21, 2014

Android R.Java file disappeared, not generated or other common issues


What is R file?

It is an auto-generated file by aapt (Android Asset Packaging Tool) that contains resource IDs for all the resources of res/ directory. If you create any component in the activity_main.xml file, id for the corresponding component is automatically created in this file. This id can be used in the activity source file to perform any action on the component.
Note: If you delete R.jar file, android creates it automatically.

How R.java file will be created ?

In R.java file, each resource category will be created as one class. In each resource class all respective elements will be created as static members, means constants. So, we should not change these values. All these are final members also, so we must access them with their class names, like R.drawable.ic_launcher, R.layout.main, etc. See below codes to know how classes will be created for each resource category.

public final class R {  

    public static final class drawable {  
        public static final int ic_launcher=0x7f020000;  
   }  
    public static final class id {  
        public static final int menu_settings=0x7f070000;  
    }  
    public static final class layout {  
        public static final int activity_main=0x7f030000;  
    }  
    public static final class menu {  
        public static final int activity_main=0x7f060000;  
    }  
    public static final class string {  
        public static final int app_name=0x7f040000;  
        public static final int hello_world=0x7f040001;  
        public static final int menu_settings=0x7f040002;  
    }  


How many classes existed with name R in an android application ?

There are 2 classes available in each android application with name R.
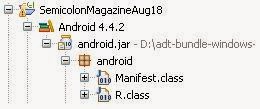
1. First class is part of android core system or android SDK, which can be accessed as android.R .We can see this class in R.class file which is available in android.jar file, which is automatically included in our project by ADT plugin.
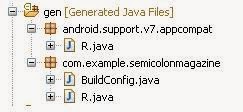
2. Second class is part of our application, which can be accessed as yourpackagename.R (yourpackagename is like com.example.semicolonmagazine). If there is support library attached in our project then , we can see two R.java file (one is support library R.java and another is our project R.java) which is available in directory gen. This R.java file is visible, only after successful build of your project.


Fig 1                                                                       Fig 2

Problems related to  R file?
·         Errors in res folder (e.g String.xml, menu.xml, other xml files within res folder)
·         May be problem in build target
·         problem in android sdk

Solution For R file not generating?

·         Fix all errors in your XML files
·         Run Project -> Clean (This will delete and regenerate R and BuildConfig)
·         Make sure Project -> Build Automatically is ticked. If not, build it manually via
Menu -> Project -> Build  Project .
·         Wait a few seconds for the errors to disappear.
·         If it doesn't work, delete everything inside the /gen/ folder
·         If it still doesn't work, try right-clicking your project -> Android Tools -> Fix Project Properties.
·         If again doesn’t work, Right-click your project > properties > Android. Look at the Project Build Target and Library sections on the right side of the page. -Your Build Target should match the target in your AndroidManifest.xml. So if it's set to target 17 in AndroidManifest, make sure that the -Target Name is Android 4.2.

·         If it still doesn't work , Make sure all the "import android.R" was removed - Clean again (if this doesn't fix it, restart eclipse and try again)

Hey Google, Android on Eclipse needs more love ! Please fix these minor issues.


© 2013 Echo "Semicolon Developers"; Kathmandu. All rights resevered @ Semicolon Developers Network Pvt. Ltd.. Designed by Templateism

Back To Top