Showing posts with label WordPress. Show all posts

Sunday, October 12, 2014

WordPress JSON API Development

WordPress is a fully featured framework with high user friendly nature and variable option of customization. There is also an availability of rss feed but when we need to built our own customized API, it is a troubling matter. I assume you are already familiar with WordPress hooks, action and filter. In this tutorial, we are going to learn about how to built our own custom API and feed the data in well known JSON format.

To create an API, the three things are required:

  1. URI : Path for accessing API
  2. Custom Variable : Required if values is being sent using GET Method
  3. Query handler : Handling the Request

Step 1: Generating URI for the API

URI is the method of accessing API defined for particular task and addition data is send to determine the action. WordPress has a convenient way to define URL. It has a built in action for rewrite rule.

add_rewrite_rule($regex, $redirect, $after);
$regex- It is used to define the URI of API like what is to be sent and a what the receiver can expect. Eg: www.example.com/values/?[0-9]
  • $redirect- It actually takes the GET data and array-matches[] is used to get the values. Eg:  www.example.com/values/?id=matches[1]
  • $after- It has two option top and bottom. "top" does not require checking of existing WordPress rule while "bottom" requires.  

Step 2: Registering Custom Variables

Custom variables are the one which is sent through the URI as like values and id in above cases. In order to use custom variable, they must be registered so that WordPress can recognize them and we can use or get them anywhere we need.

add_filter( 'query_vars', 'function_name');
function function_name($vars){
$vars[]="values";
$vars[]="id";
return $vars;
}
Now, we have two variables "values" and "id" which can be passed through the URI and it can be accessed as

global $wp;
$wp->query_vars['id'];
$wp->query_vars['values'];

Step 3: Sniffing Request and Handling Queries

We have all the necessary backbone for API but we need one more thing i.e. Query Handler. When a URI is entered in the address bar, we need to get that address and check whether that address is for our API or not, if yes we need to perform our task otherwise let it go. WordPress has a beautiful hook for it and check if our variable is present or not.

add_action('parse_request',  'sniff_requests');
function sniff_requests(){
 global $wp;
  if (!empty($wp->query_vars['values']) AND !empty($wp->query_vars['id']) ) {
$this->handle_request();
exit;
  }
}
If the URI has our function, we can run our function(handle_request) otherwise we let WordPress handle it.
Friday, September 5, 2014

My First WordPress Plugin - Tutorial Part 2

WordPress is a very flexible framework, simple to use, easy to understand and developer friendly environment. To create a plugin in WordPress basic understanding of hook and filter and action is needed.  This tutorial will guide you through basic knowledge of hooks and filter and action and focused more importantly on plugin to Custom Post Type and Custom Taxonomy.

Hook:

In general, a hook is something that is particularly attached with another thing. As like that, hook defines the relation and dependency  between the functions and action or filter in WordPress.

  1. add_filter('the_content','helloworld');
  2. function helloworld($content){
  3. $content=$content."<br>Hello World. This is Semicolon Dev ";
  4. return $content;

Lets take the above example. Here, we have used a filter function to get the content and add certain text at the end.  Line 1 has a filter:  add_filter('first_argument','second_argument') ; The first argument is used to get the content/description of the post and second one helloworld is a call to a function. Here helloworld is a function hooked with the_content.

A hook is generally used to change the default nature of the WordPress. The above example is used to change the default behavior of normal posting to adding content to each post.

Action and Filter :

Action and Filter are alias; An action hook is used to perform certain action and insert code in the WordPress core while filer hook is used to perform certain task on the content and supposed to return a value and are associated with an action.

add_action($hook$function_to_add$priority$accepted_args );
add_filter$tag$function_to_add$priority$accepted_args ); 

Custom Post Type:

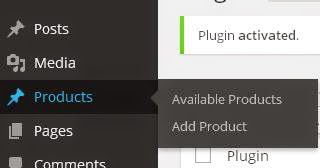
It is a WordPress linked word which is normally harder to understand. We have a admin menu-Post to the left so Custom post type is a method to create our own post type naming it, the way we prefer, providing the features we feel necessary.

function custom_post(){
$labels_post = array(
'name' =>_x( 'Products', 'post type general name' ),
'singular_name' =>_x( 'Product', 'post type singular name' ),
'add_new' =>_x( 'Add Product', 'product' ),
'all_items' =>__( 'Available Products' ),
'add_new_item' =>__( 'Add New Products' ),
'edit_item' =>__( 'Edit Product' ),
'new_item' =>__( 'New Product' ),
'view_item' =>__( 'View Products'),
'search_items' =>__( 'Search Products' ),
'menu_name' => 'Products'
);
$args= array(
'labels' => $labels_post,
'description' => 'Product Description',
'public' => true,
'supports'                => array( 'title', 'editor', 'thumbnail','comments' ),
'menu_position' => 10
);
register_post_type('name-of-the-post', $args);
}


Here, we have created a Product as a custom post type enabling the developer to customize the available field.

Custom Taxonomy:

Taxonomy is a method of grouping things under a particular heading as like category and tags which are used to bind the post with certain tags and under particular category. 

register_taxonomy'product_categories''name-of-the-post'$args );
The first argument is the name of the taxonomy, second one is the name of the post-type and last argument is an array which is used to define the necessary functions of the WordPress to be included.

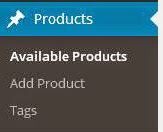
The side figure shows that the tag field has been created where the capabilities to edit, add and remove can be defined during its creation.Here $args is similar to that of above $args on labels declaration but its characteristics is defined by other values;

'hierarchical'             => true,
'show_admin_column'           => true,
'show_ui'                              => true,
'rewrite'                   => array('slug' => 'product-category', 'with_front'                                                                           =>FALSE),
'capabilities'              => array('assign_terms' => 'edit_products',
                                                   'edit_terms'   => 'edit_products',
                                                   'manage_terms' => 'edit_others_products',
                                                   'delete_terms' => 'delete_others_products')
Meta Box:

If we are creating our custom type post then it is certain that we need extra information to be included with our post which can be done using meta-boxes.


Creating a meta box is a simple task of adding an action during the post creation and it is performed with the below code:

add_action('add_meta_boxes','product_price');
Using the hook add_meta_box , we are set to create a metabox and second argument is a function which contains the features like id,title and its parent post type of the meta box.

add_meta_box$id$title$callback$post_type$context,$priority$callback_args );

  • $callback is the  reference to a  function that determines the label and input types within the meta data.The reference function takes $post as argument and a nonce field is included which is required later for verification while saving the data. wp_nonce_field  has action name and nonce name.  
  • $post_type is the name of the custom post type.
Creating meta box does not mean WordPress is going to save the data. A separate action, to save the data in the meta box table of the wordpress, has to be defined as

add_action('save_post','function-name');
In this case, the function takes $post_id as argument and it has to first verify the data with the nonce and update the post.

wp_verify_nonce($_POST['nonce-name'], 'action-name' )
$variable = $_POST['name-of-the-input-field'];
update_post_meta( $post_id, 'metabox-id', $variable );


Now, we have created a Custom Type Post and Custom Taxonomy and able to include extra field like product price using the meta-box.


Thanks for reading. Stay tuned for more posts in the series.

Friday, August 29, 2014

My First WordPress Plugin - Tutorial Part 1

WordPress Plugin is a set of one or more function that is particularly focused on performing certain task either adding a specific set of features or services to the WordPress weblog. It includes at least a PHP file and other files like css and javascript.

Step 1: Requirements

·         Familiar with basic functionality of WordPress and PHP programming
·         Installed WordPress with administrative privilege

Step 2: Folder Creation

The plugins for the WordPress are kept under the same location at wp_content/plugins. Create a folder with a unique name, the name of the folder should not coincide with other plugin name, as wp_content/plugins/your_plugin_folder_name . This folder is supposed to contain all the required files.

Step 3: File Creation

           Create a normal PHP file as index.php . The file contains the two sections:

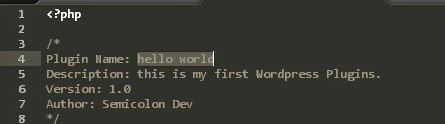
3.1.       Plugin Detail

           The descriptions are provided as comment which contains the plugin’s name, description, version and author but there is no limitation to it. You can also add its URI, author URI and license.


The above information is used to display in the plugin section. 


3.2.       Plugin function

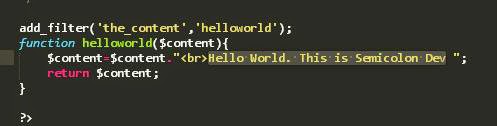
           This section is especially focused on the task as the plugin intend to perform. It contains atleast a function and may contain javascript and css files as per the complexity. As for example: a simple filter is shown below to add “Hello World. This is Semicolon Dev” at the end of the content of the pages.


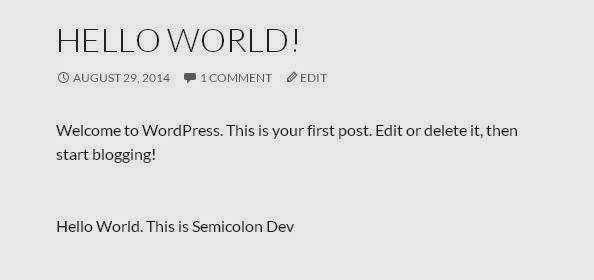
Here, we have used the filter properties of WordPress with the function add_filter(); the filter takes two argument “the_content” which obtains the content of the post and next argument: a function name “helloworld”. This function adds “Hello World. This is Semicolon Dev” to the end of every post.

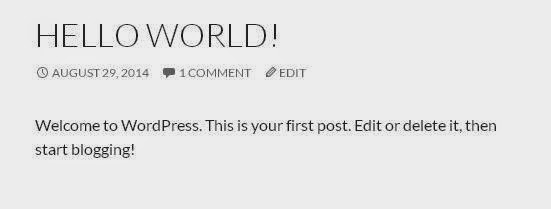
BEFORE PLUGIN ACTIVATION


AFTER PLUGIN ACTIVATION


© 2013 Echo "Semicolon Developers"; Kathmandu. All rights resevered @ Semicolon Developers Network Pvt. Ltd.. Designed by Templateism

Back To Top